- June 21, 2024
- Desserts
Banana Pudding Bars Recipe

If you are a fan of classic banana pudding, then you will truly love this variation of banana pudding bars! A fluffy, rich, and creamy banana pudding base topped over a vanilla wafer crust and garnished with whipped cream; it truly is the perfect summertime dessert!
Banana pudding bars are a delightful twist on a classic dessert, combining the rich flavors of banana pudding with the creamy texture of cheesecake and whipped cream. These banana pudding bars are perfect for any occasion and are sure to be a hit with friends and family.
Love banana recipes? Try these banana oat muffins, banana coffee cake, or this cool take on banana mochi bread!
Why This Recipe Works
- Balanced Flavors: The combination of vanilla wafer cookies and ripe bananas creates a perfect balance of sweetness and banana flavor. It takes the classic version of this recipe to the next level!
- Texture Perfection: The creamy banana pudding bars have a smooth banana whipped filling that complements the crunchy vanilla wafer crust.
- Simple Ingredients: This recipe utilizes common ingredients like cream cheese, fresh bananas, cold milk, and banana pudding mix, making it easy to prepare at any time.

Supplies Needed
- 9×13 inch Baking Pan
- Parchment paper
- Electric hand mixer
- Medium bowl
- Large bowl
- Medium saucepan
- Wire rack
Ingredients Needed
- Vanilla Wafer Crust:
- 2 cups vanilla wafer crumbs (substitute with graham cracker crumbs if desired)
- 1/3 cup melted butter (unsalted butter)
- Whipped Cream Base
- 2 cups Heavy Whipping Cream
- 1 box Instant Banana Pudding (this helps thicken and stabilize the whipped cream so the bars hold their shape)
- Banana Pudding Layer:
- 1 package instant Banana pudding mix (yes, this is a second box of pudding mix)
- 1/2 cup cold milk (you cannot substitute here or the pudding won’t set correctly)
- 16 oz. Cream Cheese (this gives the pudding a little more structure to hold up as a bar; use a full-fat cream cheese to get the correct texture)
- 3-4 ripe bananas, sliced (you can add more to your filling or as a garnish on top before serving if desired).

Step-by-Step Instructions
Vanilla Wafer Crust
- Prepare the Crust: Preheat your oven to 350°F. Line a square baking pan with parchment paper, leaving some overhang for easy removal.
- Mix Ingredients: In a medium bowl, combine the vanilla wafer crumbs and melted butter. Stir until the crumbs are evenly coated and the mixture resembles wet sand.
- Press into Pan: Press the mixture firmly into the bottom of the 9×13-inch pan to form an even layer.
- Bake: Bake for 10 minutes or until the crust is golden brown. Remove from the oven and let it cool on a wire rack. Your crust must be completely cool to the touch before adding the filling.

Banana Pudding Filling
- Prepare the Filling: In a large bowl, whisk together the softened cream cheese, banana pudding mix, and milk until smooth. Slowly mix until fully combined and whipped, and thick. Set the filling aside in a separate bowl.
- Homemade Whipped Cream: Next, make homemade whipped cream by adding the cold heavy cream to the bowl of the stand mixer. Using the whisk attachment, mix the cream on high speed until soft peaks form. Add in the second box of instant banana pudding mix. This adds additional flavor but provides the much-needed stability for the whipped cream to hold its shape for the pudding to work in “bar form”.
- Combine the Fillings: Gently fold the whipped cream mixture into the pudding and cream cheese mixture you already made. This will take a bit of time, and I only suggest doing this by hand (not with the mixer).
- Spread Over Crust: Pour half of the banana pudding filling mixture over the pre-baked crust and spread it evenly.
- Add Bananas: Top with fresh banana slices, spreading them evenly over the pudding layer.
- Topping: Finish the banana pudding bars off by covering the sliced bananas with the remaining banana pudding filling. Carefully spread it across the top in an even layer so it covers them completely (this also helps prevent them from browning for a few days).
- Chilling: Chill the bars uncovered for at least 1hour, then cover them with plastic wrap. Let them set up for 4 hours or overnight for the best results before slicing.

Tips for Serving and Storing
- Serving: Remove the bars from the fridge and remove them carefully from the pan by lifting the edges of the parchment paper. Use a sharp knife and cut them into equal-sized squares. It helps to wipe the chef’s knife after each cut to prevent a lot of messy edges.
- Garnishing: I like to pipe a little whipped cream over the top of each one. You can add a sliced banana before serving (do not add until you want to serve, or they will brown), or crushed or whole vanilla wafers as well.
- Storing: Store any leftovers in an airtight container in the refrigerator for up to 3-4 days. The bananas may brown a bit, but the filling covers them well to prevent them from getting too discolored.
- Enhancements: For a next-level banana dessert, sprinkle white chocolate chips or chocolate shavings on top. For a different flavor, consider adding a layer of graham cracker crumbs or try it with my biscoff cookie pie crust, too.

More Recipes To Try
Strawberry Pretzel Cheesecake Bars

Banana Pudding Bars Recipe
If you are a fan of classic banana pudding then you will truly love this variation of banana pudding bars! A fluffy, rich, and creamy banana pudding base topped over a vanilla wafer crust and garnished with whipped cream; it truly is the perfect summertime dessert!
Print
Pin
Rate
Servings: 24 Servings
Calories: 184kcal
Ingredients
Vanilla Wafer Crust
- 1 box Vanilla Wafers (Reserve 8-12 wafers for garnishing if desired
- 1/2 cup Butter Melted
Banana Pudding Filling
- 2 (3.4 oz. Boxes) Instant Banana Pudding (1 box of pudding is for the cream cheese mixture and the other box will be used to stabalize the whipped cream mixture)
- 1/2 cup Whole Milk Cold
- 16 oz. Cream Cheese slightly softened
- 3-4 Bananas Sliced into 1/4 inch rounds
- 2 cups Heavy Cream Cold
Instructions
Vanilla Wafer Crust
- Prepare the Crust: Preheat your oven to 350°F. Line a 9×13 inch baking pan with parchment paper, leaving some overhang for easy removal.
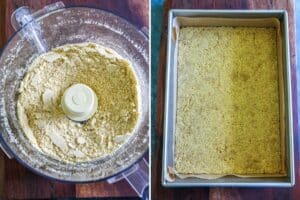
- Mix Ingredients: Add the box of vanilla wafers to a food processor and pulse until they become crumbs. Then, in a medium bowl, combine the vanilla wafer crumbs and melted butter. Stir until the crumbs are evenly coated and the mixture resembles wet sand.
- Press into Pan: Press the mixture firmly into the bottom of the 9×13-inch pan to form an even layer. I like to use a spatula or a small measuring cup to press it down.
- Bake: Bake for 10 minutes or until the crust is golden brown. Remove from the oven and let it cool on a wire rack. Your crust must be completely cool to the touch before adding the filling.
Whipped Cream and Banana Filling
- Prepare the Filling: In a large bowl, begin by preparing the pudding base by adding the 16 oz. of softened cream cheese, 1 box of instant banana pudding mix, and 1/2 cup of cold milk. Slowly mix until it is fully combined and becomes whipped and thick. Set the filling aside in a separate bowl and keep cold in the fridge for at least 15 minutes to allow the pudding to set and thicken.
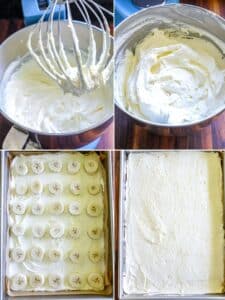
- Homemade Whipped Cream: Next, make homemade banana whipped cream by adding the cold heavy cream to the bowl of the stand mixer. Using the whisk attachment, mix the cream on high speed until it starts to form soft peaks. Add in the second box of instant vanilla pudding mix and continue to whisk on high speed until stiff peaks form. Make sure this is fully whipped; if it's too thin, the bars will not set as well. Place the whipped cream mixture into the fridge to chill and set for 15 minutes.
- Combine the Fillings: Gently fold the whipped cream mixture into the pudding and cream cheese mixture you already made. This will take a bit of time and I only suggest doing this by hand (not with the mixer).
- Spread Over Crust: Pour half of the banana pudding filling mixture over the pre-baked crust and spread it evenly.
- Add Bananas: Add the sliced bananas to the banana cream layer and lightly press them down.
- Topping: Finish the banana pudding bars off by covering the sliced bananas with the remaining banana pudding filling. Carefully spread it across the top in an even layer so it covers them completely.
- Chilling: Chill the bars uncovered for at least one hour, then cover them with plastic wrap. Let them set up for 4 hours or overnight for best results.
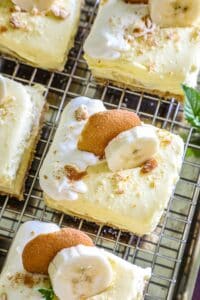
- Slicing: Remove the bars from the fridge and remove them carefully from the pan by lifting the edges of the parchment paper. Use a sharp knife and cut them into equal-sized squares. It helps to wipe the chef's knife after each cut to prevent a lot of messy edges.
- Garnishing: I like to pipe a little whipped cream over the top of each one. You can add a sliced banana before serving or crumbled or whole vanilla wafers as well.
Notes
This is best stored in an airtight container for 3-4 days in the fridge.
Nutrition
Serving: 1bar | Calories: 184kcal | Carbohydrates: 5g | Protein: 2g | Fat: 18g | Saturated Fat: 11g | Polyunsaturated Fat: 1g | Monounsaturated Fat: 5g | Trans Fat: 0.2g | Cholesterol: 52mg | Sodium: 97mg | Potassium: 105mg | Fiber: 0.4g | Sugar: 3g | Vitamin A: 681IU | Vitamin C: 1mg | Calcium: 40mg | Iron: 0.1mg
Can I make with cool whip🙈? These look delicious. Cool whip was bogo at Publix & I have two giant things of it!
You can but the bars may not hold their shape in the same way. They may be too thin and come out closer to the same texture as of banana pudding.
Awesome